
Risk Level: Medium
Description:
On Azure virtual machines, this plugin ensures that accelerated networking is enabled (VM). Single root I/O virtualization (SR-IOV) is enabled by accelerated networking, which dramatically improves a VM's networking performance.
Recommended Action: Enable accelerated networking in virtual machine network interfaces.
About the Service :
Azure Virtual Machines (VM) are one of several forms of scalable, on-demand computing resources offered by Azure. VMs are typically used when you require more control over the computing environment than the other options provide. This article explains what you should think about before creating a virtual machine, how to construct one, and how to administer one.
Impact:
All network traffic into and out of virtual machines must pass through the host and virtual switch without faster networking. It also leads to high latency and low throughput for the network interfaces attached to the VMS.
Steps to Reproduce :
- Sign in to Azure Management Console.
- Navigate to the “ Home “ portal of the Azure Console.
- From the Azure Services, select Virtual Machines.
- Select the VM you want to examine.
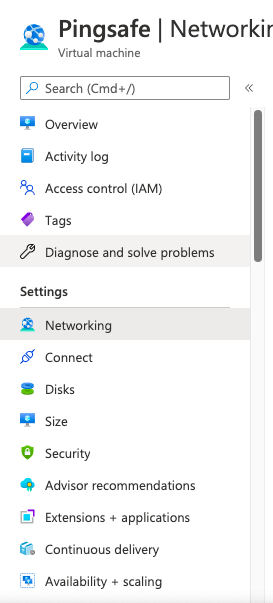
- Under Settings in the navigation panel, select Networking, to view networking configurations.
- On the Networking page, under the Network Interface section, check the status of Accelerated Networking.
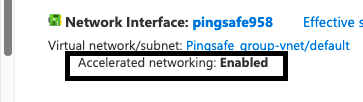
- If the value is set to Disabled, the Accelerated Networking feature is not enabled for the selected Microsoft Azure virtual machine.
- Repeat steps no. 4 – 10 for each Azure virtual machine available in the selected subscription and for other subscriptions created in your Microsoft Azure cloud account.
Steps for remediation( Using Azure CLI ) :
- Run vm deallocate command to deallocate the Azure virtual machine you want to reconfigure.
az vm deallocate --name < vm name > --no-wait --resource-group <resource group name >
- Run network nic update command to enable the accelerated networking feature for the selected vm.
az network nic update --resource-group <resource group name > --name <nic name> --network-security-group <network security group name>
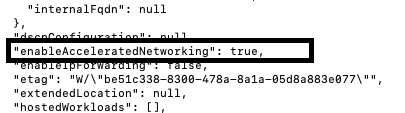
- The following metadata should be shown as output
- Run vm start command to restart the reconfigured azure virtual machine.
az vm start --name Pingsafe --resource-group <resource_group_name>
- Run steps number 1-5 to enable accelerated networking for other Azure virtual machines available in the current subscription and for other subscriptions in your Microsoft Azure cloud account.
References:
- https://docs.microsoft.com/en-us/azure/virtual-network/create-vm-accelerated-networking-cli
- https://docs.microsoft.com/en-us/azure/virtual-network/virtual-network-network-interface
Please feel free to reach out to support@pingsafe.ai with any questions that you may have.
Thanks
PingSafe Support