
This plugin ensures autoscaling groups with attached AWS Elastic Load Balancers are operating in the same availability zone as that of the Load Balancers.
Risk Level: Medium
Description
This plugin ensures autoscaling groups with attached AWS Elastic Load Balancers are operating in the same availability zone as that of the Load Balancers. Load Balancers must be created in the same availability zones as the backend instances in the autoscaling group to prevent instances without ELB in a region.
About the Service
AWS Auto Scaling: As the name suggests, AWS AutoScaling monitors the running resources and if required, increases the scaling capability at the lowest possible costs. AutoScaling is easy to set up and automatically maintains performance of your cloud infrastructure.
Impact
Instances that are launched by your Auto Scaling group are automatically associated with the load balancer connected with the AWS Auto Scaling group. In order to function properly, the availability zones of the Autoscaling group must be the same as that of the ELB’s attached.
Steps to Reproduce
Using AWS Console-
- Log In to your AWS Console.
- Open the Amazon EC2 Console. You can use this link (https://console.aws.amazon.com/ec2) to navigate directly if already logged in.
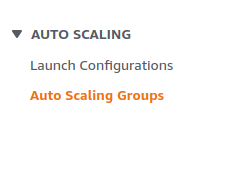
- Scroll down and select Auto Scaling Groups under the Auto Scaling section from the left pane.
- A list of Auto Scaling Groups will be displayed, select the one you want to investigate by clicking on its Name.
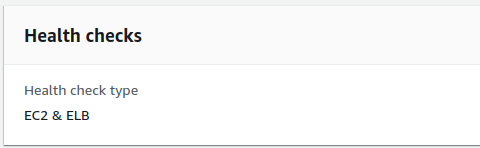
- First verify if ‘ELB’ health check is active by moving to the Health Check section. If not, this vulnerability won’t arise in this autoscaling group.
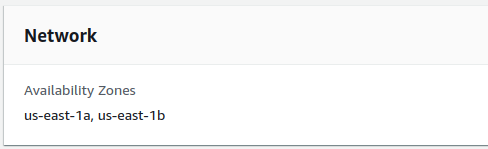
- Move to the Network section. Note down the Availability Zones of the Auto Scaling Group.
- Now, in the Load Balancing section, open the classic Load Balancer attached by clicking on it’s link.
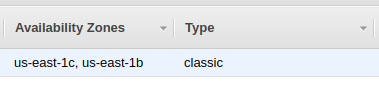
- A new window with the ELB details is opened. Check the Availability Zones of the ELB. If the ELB zones are different from the Auto Scaling Group zones, the vulnerability exists.
- Repeat steps 3 to 8 for all the Auto Scaling groups you want to investigate.
Steps for Remediation
Update the ELB to use the same availability zones as the autoscaling group.
- Log In to your AWS Console.
- Open the Amazon EC2 Console. You can use this link (https://console.aws.amazon.com/ec2) to navigate directly if already logged in.
- Scroll down and select Auto Scaling Groups under the Auto Scaling section from the left pane.
- A list of Auto Scaling Groups will be displayed, select the vulnerable group by clicking on its Name.
- Now, in the Load Balancing section, open the classic Load Balancer attached by clicking on it’s link.
- A new window with the ELB details is opened. Move to the Instances tab below.
- Click on Edit Availability Zones.
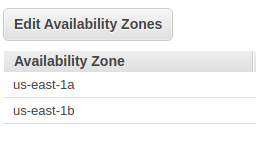
- From the list of subnets. Add the subnets of zones missing as per the Availability Zones of the Auto Scaling Group.

- Click on Save after doing the changes.
- Repeat steps 3 to 9 for all the vulnerable Auto Scaling groups.