
Ensures that Dataproc clusters have CMEK encryption enabled.
Risk Level: Low
Description
This plugin ensures that the Google Cloud Dataproc clusters are encrypted using Customer-Managed Encryption. CMEK gives you more control over the key operations compared to the Google-managed encryption keys. These keys can be created by the users using the Google Cloud Key Management Service. They can be used to encrypt the object’s data, the object’s CRC32C checksum, and the MD5 hash.
About the Service
Google Cloud Dataproc:
Dataproc is a managed service for any OSS operation that requires big data processing, such as ETL or machine learning. It offers excellent support for the most widely used open-source software and assists you in streamlining your data and analytics processing. You can migrate your OSS clusters to the cloud with the help of dataproc to improve efficiency and scalability. Dataproc manages cluster creation, monitoring, as well as job orchestration. To know more about Dataproc, read here.
Impact
Google-Managed Encryption Keys is the default encryption provided whenever a new Dataproc cluster is created. However, GMEKs offer very little flexibility and make everything is transparent to the client. CMEKs, on the other hand, allows the user to tailor the encryption to their specific requirements, resulting in greater security.
Steps to Reproduce
Using GCP Console-
- Log In to your GCP Console.
- From the top navigation bar, select the GCP project you want to investigate.

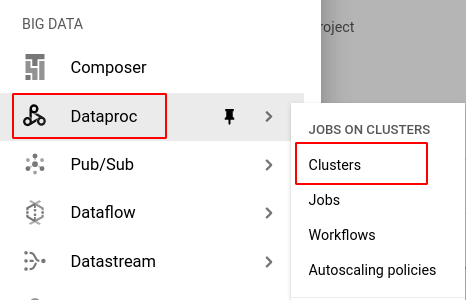
- From the navigation panel on the left side of the console, go to Dataproc and click on Clusters. You can use this link here to navigate directly if you’re already logged in.
- Select the cluster you want to investigate from the list of clusters available and click on the CONFIGURATION tab to check the configuration settings.
-png-May-07-2022-06-47-28-49-AM-1.png)
- Under the Configuration section, check if any configuration information is specified about Encryption with a Customer-managed key. If not, then the selected dataproc instance is not encrypted with a CMEK.
-png-May-07-2022-06-47-35-65-AM-1.png)
- Repeat steps 4 and 5 for all the Dataproc clusters you want to investigate in the selected project.
- If you have multiple projects, repeat steps 2 to 6 for each project in your GCP Console.
Steps for Remediation
Determine whether or not you truly require customer-managed encryption to be disabled. If not, make the necessary changes to enable it using the steps below.
Note: It is not possible to update the encryption of an existing Dataproc cluster. Instead, a new cluster can be created with the same configurations to replace it.
Using GCP Console-
- Log In to your GCP Console.
- From the top navigation bar, select the GCP project you want to investigate.

- To encrypt your Dataproc cluster using customer-managed keys, make sure that you first create a new key that can be used for this.
NOTE: If you already have a CMEK that you wish to use, skip to step 10. - From the navigation panel on the left side of the console, go to Security under the More products section and select Key management. You can click this link here to navigate directly if you’re already logged in.
-png-May-07-2022-06-47-54-04-AM-1.png)
- To create a key, you must first create a key ring. Click on the CREATE KEY RING button on the top bar.
-png-4-1.png)
NOTE: If you already have a key ring created that you wish to use, skip to step 7. - In the Create key ring page, enter your desired Key ring name and select your preferred location type. Click the CREATE button to create the new key ring.
-png-3-1.png)
- Go to the newly created key ring and select the CREATE KEY button to create a new key.
-png-3-1.png)
- In the Create key page, select Generated key as the type of key you wish to create. Next, enter your preferred key name, choose your desired protection level, and select purpose as Symmetric encrypt/decrypt.
-png-1-1.png)
- Choose your required configurations for the key rotation period and click on CREATE to create the key.
-png-1-1.png)
- From the navigation panel on the left side of the console, go to Dataproc and click on Clusters. You can use this link here to navigate directly if you’re already logged in.
-png-May-07-2022-06-48-47-96-AM-1.png)
- Select the cluster you want to recreate from the list of clusters available and note down all its configuration settings. (In case you aren’t sure which Dataproc cluster needs to be configured, follow the steps to reproduce listed above to determine which to choose.)
- Go back to the Clusters page and click on the CREATE CLUSTER button.
-png-4-1.png)
- Fill in a unique name for your cluster and the rest of the configurations according to the original instance.
- Next, click on Manage security to configure the encryption settings.
-png-3-1.png)
- Under Encryption, select the Use a customer-managed encryption key (CMEK) option.
-png-2-1.png)
- From the drop-down dox available to select a key, select your desired key. If no valid keys are found, click on can’t see your key? Enter key resource name to enter your key resource name.
-png-1-1.png)
- In the Enter key resource name pop-up box, enter your desired key resource in the specified format and click SAVE.
-png-1-1.png)
Note: To find the resource name of the key, go to the navigation panel on the left side of the console and click to Security under the All products section, and select Key management. Select your desired key ring and from the list of keys in that particular keyring, click the actions button (three-dot icon) and select the copy resource name option.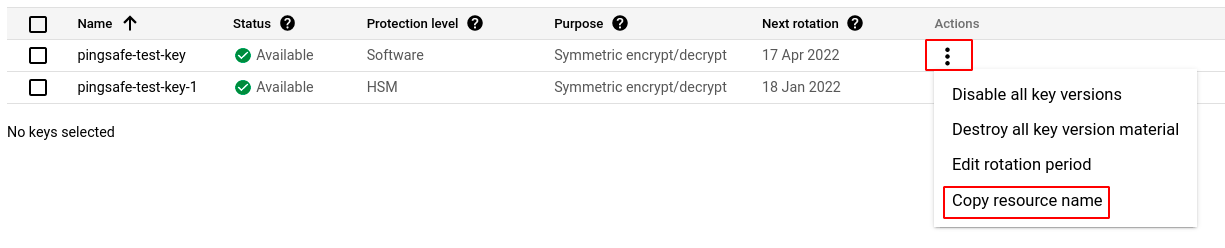
- Configure the rest of the settings based on the original instance and click CREATE to create the new cluster.
-png-1-1.png)
- Finally, delete the original cluster to avoid unwanted billing charges. To do so, click on the DELETE button on the top bar of the original cluster, confirm the deletion in the pop-up box by clicking on the DELETE button.
-png-4.png)
-png-Jun-14-2022-02-30-55-84-PM.png)
- Repeat steps 3 to 19 for all the Dataproc clusters you want to reconfigure in the selected project.
- If you have multiple projects, repeat steps 2 to 20 for each project in your GCP console.