
Risk Level: Medium
Description
This plugin guarantees that the bucket related to Log Sinks is legitimate and not hanging, which means the bucket should be valid. On the chance, if logs are sent to a storage bucket, the bucket must exist.
About the Service
Google Cloud Logging:
Cloud Logging is a fully managed service that allows you to store, search, analyze, monitor, and alert on logging data and events from Google Cloud and Amazon Web Services. Logging lets you read and write log entries, query your logs, and control how you route and use your logs. Log-based metrics are based on the content of log entries. For example, the metrics can record the number of log entries containing particular messages, or they can extract latency information reported in log entries. You can use log-based metrics in Cloud Monitoring charts and alerting policies. To know more about GCP Cloud Load Balancing click here.
Impact
Cloud Logging uses log buckets as containers in your Google Cloud projects, billing accounts, folders, and organizations to store and organize your logs data. The logs that you store in Cloud Logging are indexed, optimized, and delivered to let you analyze your logs in real-time. Cloud Logging buckets are different storage entities than the similarly named Cloud Storage buckets. This plugin ensures that the bucket associated with Log Sinks is valid and not dangling. If logs are sent to a storage bucket, the bucket must exist. Thus, the recommended action for this is to ensure that the default audit logs are enabled to log all admin activities and write and read access to data for all services.
Steps to Reproduce
Using GCP Console-
In order to ensure that the bucket associated with Log Sinks is valid and not dangling, follow the steps mentioned below:
- Firstly, use the administrator account for signing up to Google Cloud Platform Console.
- Now, from the top navigation bar, select the GCP Project you want to investigate in.

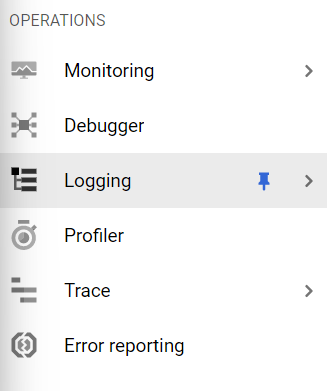
- From the Navigation Menu on the left, you may find Logging section under the Operations Section, click on it.
- Under Logging section, click on the Logs Router button. Thence, a new Page will appear.
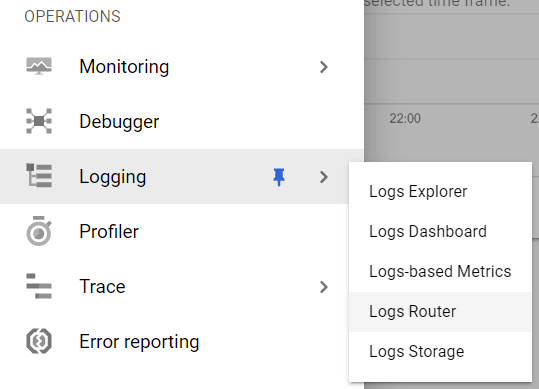
- A Logs Router Page will appear on the screen with a alist of Logs Router Sinks available in the current GCP project.

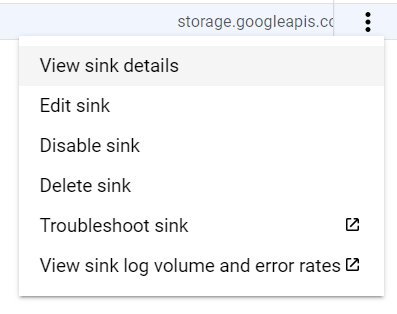
- Select the Log Router Sink you want to investigate about. Click on the three dots available at the right of the sink row.

- Now, select the View Sink Details option from the dropdown menu.
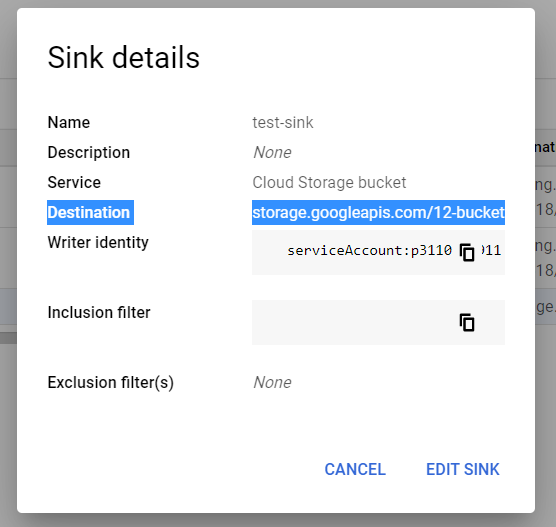
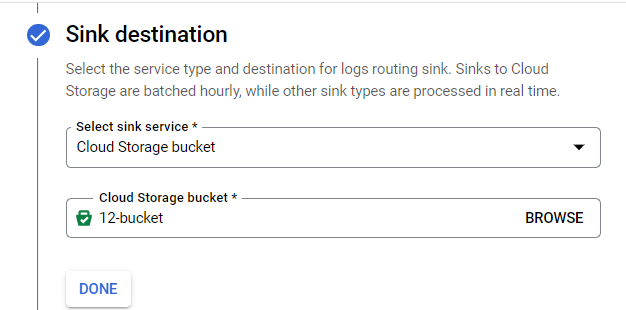
- A dialog box of Sink Details will appear on the screen. Check for the Destination option, present in it and note down the destination for that log router sink.
- Now, cancel it and go to the search bar available at the top and search Cloud Storage in it.

- A new Cloud Storage page will appear with a list of all the buckets available in your current GCP project.
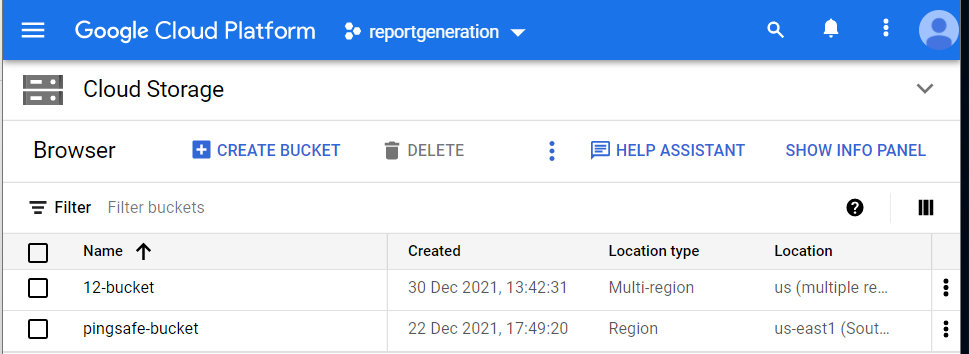
- Now, check if the bucket name is present here, which you have noted down in step 8.
- If the bucket is present, then the bucket associated with Log Sinks is valid and not dangling.
- You may repeat the above-mentioned steps to check for the other GCP projects/folders in your organization.
Steps for Remediation
Using GCP Console-
In order to reconfigure the dangling or invalid bucket associated with logs router sinks, follow the steps mentioned below:
- Firstly, use the administrator account for signing up to Google Cloud Platform Console.
- Now, from the top navigation bar, select the GCP Project you want to investigate in.
- From the Navigation Menu on the left, you may find Logging section under the Operations Section, click on it.
- Under Logging section, click on the Logs Router button. Thence, a new Page will appear.
- A Logs Router Page will appear on the screen with a alist of Logs Router Sinks available in the current GCP project.
- Select the Log Router Sink you want to investigate about. Click on the three dots available at the right of the sink row.
- Now, select the View Sink Details option from the dropdown menu.
- A dialog box of Sink Details will appear on the screen. Check for the Destination option, present in it and note down the destination for that log router sink.
- Now, cancel it and go to the search bar available at the top and search Cloud Storage in it.
- A new Cloud Storage page will appear with a list of all the buckets available in your current GCP project.
- Now, check if the bucket name is present here, which you have noted down in step 8.
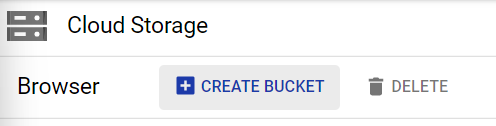
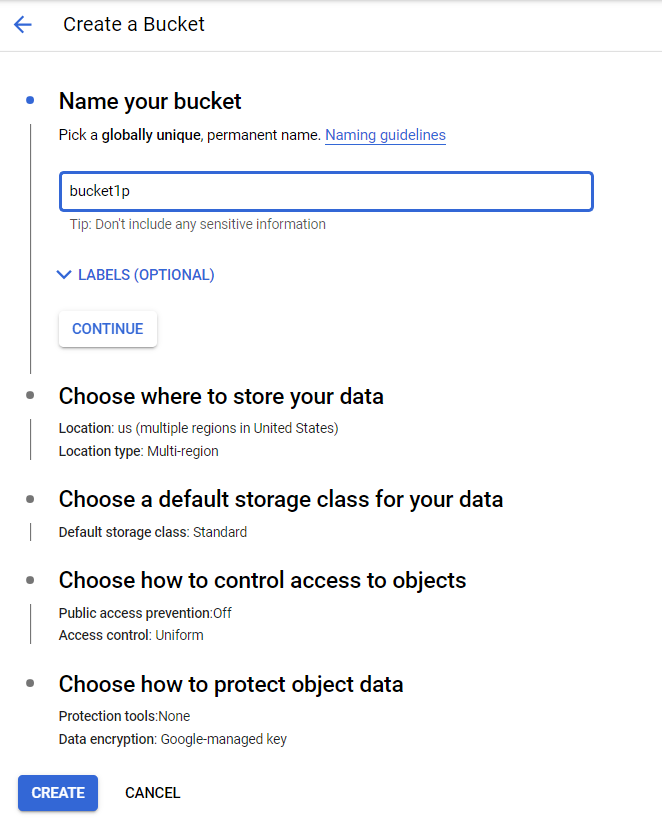
- If the bucket is present, then the bucket associated with Log Sinks is valid and not dangling. If not, click on the Create Bucket button present at the top nav bar.
- Enter the required details for creating the bucket like, Bucket Name, Location, etc, and click on the Create button present at the bottom.
- Now, go back to the Logs Router Sink page again and select the log router sink by clicking on the three dots. Choose the Edit sink option from the dropdown menu.
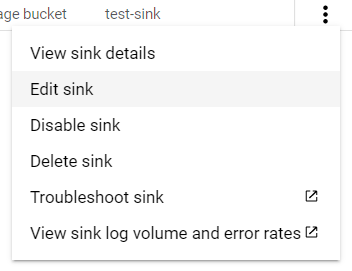
- Reconfigure the settings of that particular sink in order to match the existing buckets in your current GCP project.
- Click on the Update Sink button present at the bottom of the page.
- You may repeat the above-mentioned steps to check for the other GCP projects/folders in your organization.