
Ensures that the Autohealing feature is enabled for the managed instance groups.
Risk Level: Low
Description
This plugin ensures that the Compute Engine Managed Instance Groups (MIGs) have the Autohealing feature enabled. When this option is selected, the unhealthy Virtual Machine instances are replicated using the original instance template used when the VM was formed. A maximum of one auto-healing policy can be set per MIG.
About the Service
Google Cloud Compute Engine:
Google Cloud Compute Engine is a service that allows you to create Virtual Machines based on your preferences and run them on Google’s infrastructure. You can either use their predefined machines with certain default configurations or create your own custom Virtual Machine to meet your exact requirements. To know more, read here.
Impact
The availability of an app is harmed when it crashes or freezes. In addition, latency and downtime are impacted. Apps that have been compromised can be automatically restarted using auto-healing. It works by automatically recognizing and recreating failing instances, ensuring that no problems develop as a result of failures.
Steps to Reproduce
Using GCP Console-
- Log In to your GCP Console.
- From the top navigation bar, select the GCP project you want to investigate.

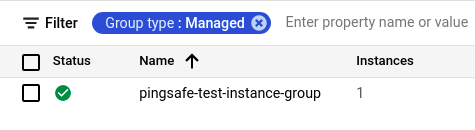
- From the navigation panel on the left side of the console, go to Compute Engine and select Instance groups. You can use this link here to navigate directly if you’re already logged in.
- Set Group Type to Managed in the Filter box to only see Managed Instance Groups.
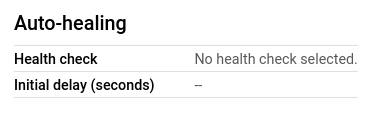
- Select the MIG you want to investigate from the list of instances and go to the Details tab to examine the details of the MIG selected.

- In the Auto-healing section, check the configuration of the Health check. If it says no health check selected then the selected MIG does not have auto-healing enabled.
- Repeat steps 4 and 5 for all the VM instances you want to investigate in the selected project.
- If you have multiple projects that you want to investigate, repeat steps 2 to 6 for each project in your GCP console.
Steps for Remediation
Determine whether or not you truly want auto-healing to be disabled. If not, follow the steps below to make the necessary changes.
Using GCP Console-
- Log In to your GCP Console.
- From the top navigation bar, select the GCP project you want to investigate.
- From the navigation panel on the left side of the console, go to Compute Engine and select Instance groups. You can use this link here to navigate directly if you’re already logged in.
- Set Group Type to Managed in the Filter box to only see Managed Instance Groups.
- Select the MIG you want to reconfigure in the list of instance groups available.(In case you aren’t sure which MIG needs to be configured, follow the steps to reproduce listed above to determine which to choose.)
- Click on the EDIT button on the top bar to edit the configurations.

- On the edit page, choose a pre-existing health check from the drop-down list available or create a new health check as per your needs.
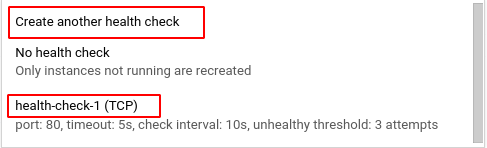
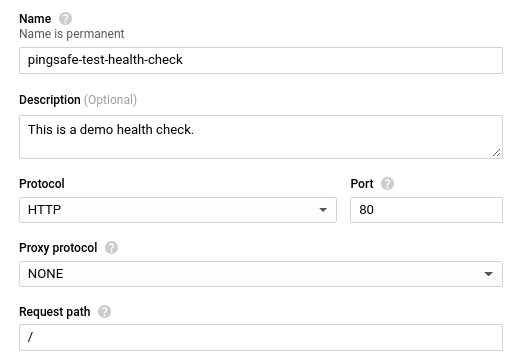
Note: If you’re selecting a pre-existing health check, go to step 11. - If you’re creating a new health check, enter a unique name and a short description(optional) about the health check. Choose HTTP for the Protocol and Port as 80. Next, select NONE for Proxy Protocol and enter the path for the health check request. (The default is /)
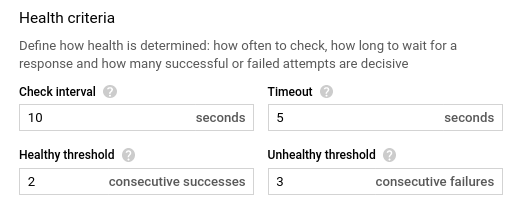
- Next, in the Health criteria section, enter your desired values for check interval, timeout, healthy threshold, and unhealthy threshold. The default values are 10, 5, 2, and 3 respectively (as shown in the screenshot below.)
- Finally, click Save and continue to create the new health check.

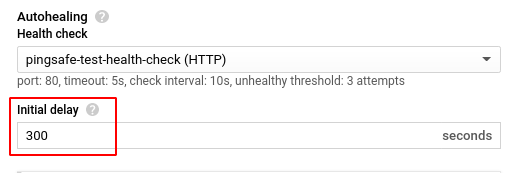
- Enter your desired value for Initial delay and click Save to enable the health check.
- However, to connect the health check to the instances in the group, you must first configure the firewall rules. For this, navigate to the Firewall page to create a new firewall rule.
From the navigation panel on the left side of the console, go to VPC network in the NETWORKING section and select Firewall. You can use this link here to navigate directly.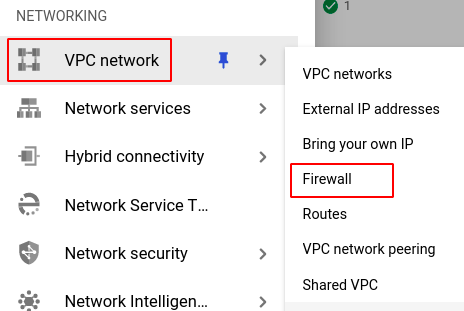
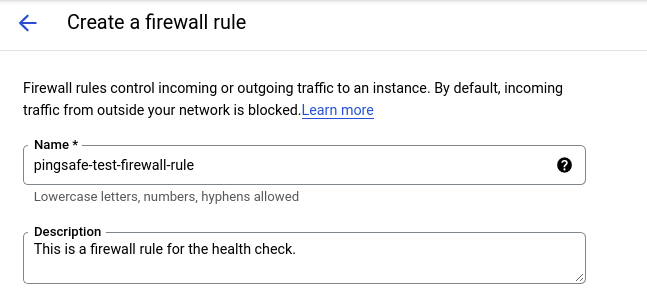
- In the Create a firewall rule page, enter a unique name for the new rule and an appropriate description (optional).
- Set the Network to Default.

- If you do not have specific target tags, choose All instances in the network from the Targets drop-down list.

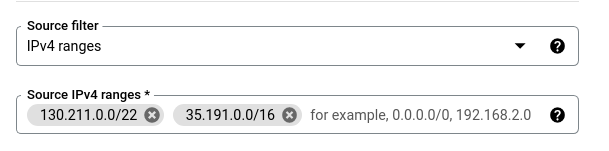
- For Source filters, select IPv4 ranges and for Source IPv4 ranges enter 130.211.0.0/22 and 35.191.0.0/16. (This is because the health check probes come from addresses in these ranges)
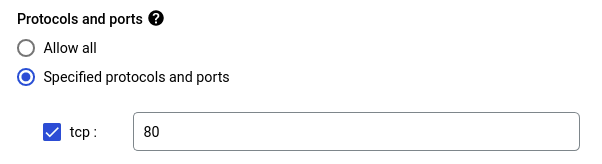
- Select Specified protocols and ports under the Protocols and ports section and enter tcp: 80. Finally, click CREATE to create the new rule.
- Repeat steps 3 to 11 for all the VM instances you want to reconfigure in the selected project.
- If you have multiple projects, repeat steps 2 to 12 for each project in your GCP console.