
Ensures that instances are updated to the latest version of the MySQL database.
Risk Level: High
Description
This plugin ensures that all MySQL database instances are using the latest MySQL database version. The first two numbers in the version number indicate the major version number and the rest indicates the minor version for MySQL, and each major version is supported for at least three years.
About the Service
Google Cloud SQL:
Google Cloud SQL is a relational database for MySQL, PostgreSQL, and SQL Server that is fully managed. It automates database provisioning, storage capacity management, replication, and backups while lowering maintenance costs. It can be set up easily using the built-in migration tools and lets you scale your instances effortlessly. To know more about Cloud SQL, read here.
Impact
It is critical to always stay up to date with the latest version of the MySQL database in order to gain access to all of the latest features, increase the stability and security of your database instances, and eliminate outdated features.
Steps to Reproduce
Using GCP Console-
- Log In to your GCP Console.
- From the top navigation bar, select the GCP project you want to investigate.

- From the navigation panel on the left side of the console, go to SQL. You can use this link here to navigate directly if you’re already logged in.
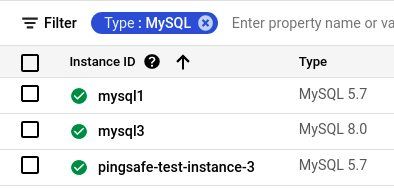
- Set Type to MySQL in the Filter box to only see MySQL database instances.
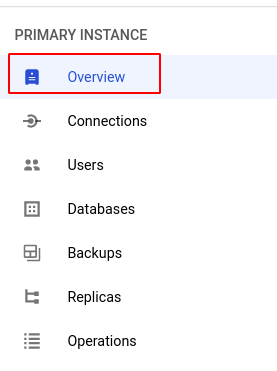
- Select the ID of the SQL instance you want to investigate from the list of instances available and click on the OVERVIEW tab to check the configuration settings of the selected instance.
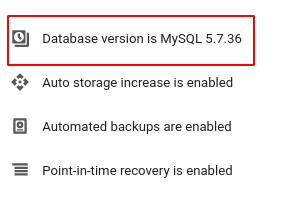
- In the Configuration section, check the Database version specified. If the mentioned version is older than the latest version supported by the Google Cloud Platform, then the selected MySQL instance does not have the desired version.
- Repeat steps 5 and 6 for all the SQL instances you want to investigate in the selected project.
- If you have multiple projects, repeat steps 2 to 7 for each project in your GCP Console.
Steps for Remediation
Make the necessary changes to stay updated with the latest major version of the MySQL database using the steps below.
Note: It is not possible to update the version of an existing MySQL instance. Instead, a new instance can be created with the same configurations to replace it.
Using GCP Console-
- Log In to your GCP Console.
- From the top navigation bar, select the GCP project you want to investigate.
- From the navigation panel on the left side of the console, go to SQL. You can use this link here to navigate directly if you’re already logged in.
- Set Type to MySQL in the Filter box to only see MySQL database instances.
- Select the ID of the SQL instance you want to reconfigure in the list of instances available and note down all its configuration settings. (In case you aren’t sure which SQL instance needs to be configured, follow the steps to reproduce listed above to determine which to choose.)
- Go back to the SQL instances page and click on the CREATE INSTANCE button. In the Choose your database engine section, select Choose MySQL to create a MySQL instance.


- Fill in your desired values for the Instance ID and Password fields and the rest of the configurations according to the original instance.
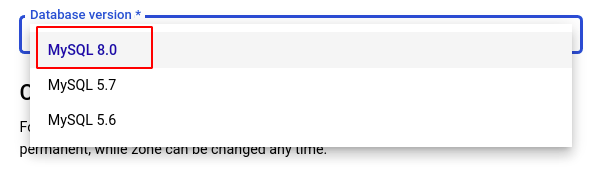
- Select the latest major version of the MySQL database from the Database version drop-down list.
- Click CREATE INSTANCE to create the new instance.

- Once the MySQL instance starts running, go to the original instance and click on the EXPORT button on the top navigation bar.

- In the Export data to Cloud Storage page, select your desired specifications and click on EXPORT.
- Go back to the newly created instance and click on the IMPORT button on the top bar.

- Enter the source and destination details as well as your desired file format and click on IMPORT to import the data into the newly created MySQL instance.
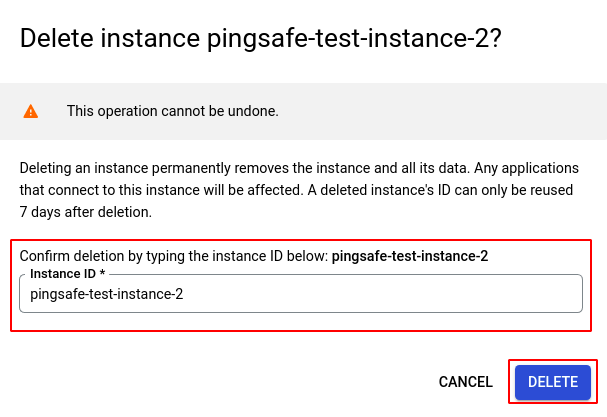
- Finally, delete the original instance to avoid unwanted billing charges. To do so, click on the DELETE button on the top bar of the original instance, confirm the deletion in the pop-up box, and click on DELETE.
- Repeat steps 5 to 14 for all the SQL instances you want to reconfigure in the selected project.
- If you have multiple projects, repeat steps 2 to 15 for each project in your GCP console.