
Ensure that the TCP port 23 for the Telnet Protocol is not open to public
Risk Level: High
Description
This plugin determines if the TCP port 23 for the Telnet Protocol is open to the public. Unlike HTTP and HTTPS, which can be available to public access, Telnet ports must be restricted to known IP addresses. TCP port 23 is used by Telnet protocol to provide a two-way collaborative and text-based channel between two systems.
To minimize false positives, this plugin reports only those security groups with public IP associated with any of its network interfaces.
About the Service
Amazon EC2: Amazon Elastic Compute Cloud (Amazon EC2) provides scalable computing capacity in the Amazon Web Services (AWS) Cloud. With the EC2 instance, you can launch as many virtual servers as you need, configure security and networking, and manage storage without worrying about the hardware needs of the process. Security Groups act as a firewall for an EC2 instance to control the incoming and outgoing traffic. You can read more about security groups here.
Impact
Security Groups act as a firewall for the EC2 instances to control the incoming and outgoing traffic. There are rules defined under security groups that can allow specific IP addresses to access the EC2 instance with the protocol and the Ports specified.
Telnet is a network protocol that establishes a collaborative connection between two clients. Unlike SSH, Telnet does not provide an encrypted communication channel. The authentication credentials are passed as plain texts and if the port is publicly accessible, anyone can monitor it to gain access to the user’s device. It is highly recommended to provide Telnet access to only trusted IP addresses.
Steps to Reproduce
Using AWS Console-
- Log In to your AWS Console.
- Open the EC2 Management Console. You can use this link (https://console.aws.amazon.com/ec2) to navigate directly if already logged in.
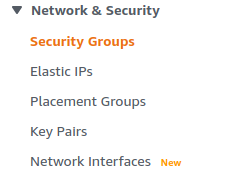
- Move to the Security Group in the Network and Security section from the left navigation pane.
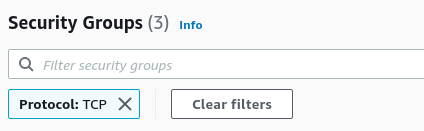
- You will find a list of Security Groups available. In the Filter security groups bar type Protocol: TCP to filter out all the security groups having rules for the mentioned protocol. From the list of security groups, choose one by clicking on its Security group ID.
- The Inbound rules tab will be selected which has a list of rules for the security group. Investigate the Source column, and find the rules that have the source set to Anywhere (0.0.0.0/0 or ::/0). Similarly, find if the Port is set to 23 with the Protocol TCP. It implies that the instances and resources attached to the security group can accept public requests through TCP protocol from Port 23.

- Repeat steps 4 to 5 for all the Security Groups you want to investigate.
Steps for Remediation
Modify the security group and permit only required IP addresses to access the MySQL server:
- Log In to your AWS Console.
- Open the EC2 Management Console. You can use this link (https://console.aws.amazon.com/ec2) to navigate directly if already logged in.
- Move to the Security Group in the Network and Security section from the left navigation pane.
- You will find a list of Security Groups available. In the Filter security groups bar type Protocol: TCP to filter out all the security groups having rules for the mentioned protocol. From the list, choose the vulnerable security group by clicking on its Security group ID.
- The Inbound rules tab will be selected along with a list of rules for the security group. Click on the Edit Inbound Rules button on the right.

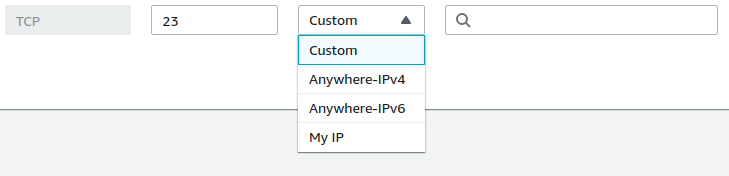
- From the list of rules with TCP Protocol and Port 23, click on the close button beside the (0.0.0.0/0 or ::/0) in the Source column. It will clear all the IP addresses allowed to access the instance. From the Source drop-down menu, select Custom and enter all the IP addresses you want to give access to following the protocol.
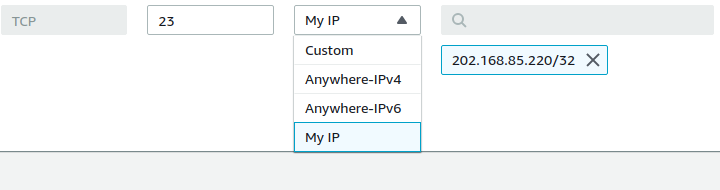
- To allow only your IP to access the instance, select the My IP option. You can read more about all the options available here.
- Click on Preview Changes to preview the changes, and Save rules to save them.

- Repeat steps 4 to 8 for all the Security Groups you want to fix.
References