
Ensures that instances are configured with the shielded VM enabled.
Risk Level: Low
Description
This plugin ensures that Virtual Machine instances are configured with the shielded VM feature enabled. Shielded VMs are virtual machines that help defend against rootkits and bootkits. They aid in the protection of instances against threats, attacks, and privilege escalation.
About the Service
Google Cloud Compute Engine:
Google Cloud Compute Engine is a service that allows you to create Virtual Machines based on your preferences and run them on Google’s infrastructure. You can either use their predefined machines with certain default configurations or create your own custom Virtual Machine to meet your exact requirements. To know more, read here.
Impact
Disabling the Shielded Virtual Machine (VM) instances feature makes your instances less secure and increases the risk of malware or rootkits attacks. Features like vTPM shielding or sealing, which help prevent data exfiltration, will also be disabled unless you have the protected VM feature enabled. Thus, there is a larger risk of data leakage. To know more about data exfiltration, read here.
Steps to Reproduce
Using GCP Console-
- Log In to your GCP Console.
- From the top navigation bar, select the GCP project you want to investigate.

- From the navigation panel on the left side of the console, go to Compute Engine and select VM Instances. You can use this link (https://console.cloud.google.com/compute) to navigate directly if you’re already logged in.
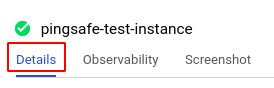
- Select the VM instance you want to investigate from the list of instances and go to the Details tab to examine the details of the VM instance selected.
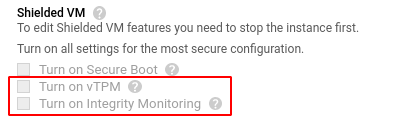
- Scroll down to the Shielded VM section and check the status of Turn on vTPM and Turn on Integrity Monitoring. If both the settings are disabled (unchecked) then the selected Virtual Machine (VM) instance is not protected by the Shielded VM feature.
- Repeat steps 4 and 5 for all the VM instances you want to investigate in the selected project.
- If you have multiple projects that you want to investigate, repeat steps 2-6 for each project in your GCP console.
Steps for Remediation
Determine whether or not you truly require the shielded VM feature to be disabled. If not, make the necessary changes to enable automatic restart of your VM instances.
The steps to enable shielded VM are-
Using GCP Console-
- Log In to your GCP Console.
- From the top navigation bar, select the GCP project you want to investigate.
- From the navigation panel on the left side of the console, go to Compute Engine and select VM Instances. You can use this link (https://console.cloud.google.com/compute) to navigate directly.
- Choose the virtual machine (VM) instance you want to change the settings for, select the STOP button from the top navigation bar and confirm the action in the confirmation box.
- Now, click on the EDIT button on the top navigation bar to edit the required configurations of the VM instance.
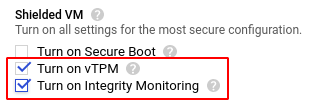
- Scroll down to the Shielded VM section and select the Turn on vTPM and Turn on Integrity Monitoring options’ checkbox to enable these two settings.
- Note: Select the Turn on Secure Boot checkbox to enable Secure Boot component only if no custom or unsigned drivers are installed on the selected instance. This is because enabling the Secure Boot component on a virtual machine (VM) that uses custom or unsigned drivers will prevent it from booting.
- Click the Save button after making all the necessary changes.
- Select the START button from the top navigation bar and confirm the action in the confirmation box. This VM instance is now successfully using the new GCP service account you created.
- Repeat steps 4 to 9 for all the VM instances you want to reconfigure in the selected project.
- If you have multiple projects, repeat steps 2 to 10 for each project in your GCP console.