
Ensures that SQL instances do not allow public access.
Risk Level: High
Description
This plugin guarantees that SQL instances are configured to block traffic from the global IP address (0.0.0.0). Unless absolutely essential, SQL instances should not allow access to anyone on the internet. Instead, they should be kept private within a Virtual Private Cloud (VPC) network.
About the Service
Google Cloud SQL:
Google Cloud SQL is a relational database for MySQL, PostgreSQL, and SQL Server that is fully managed. It automates database provisioning, storage capacity management, replication, and backups while lowering maintenance costs. It can be set up easily using the built-in migration tools and lets you scale your instances effortlessly. To know more about Cloud SQL, read here.
Impact
If your instance is publicly accessible, anyone on the internet can try to get in through the network firewall. As a result, attackers will have an easier time getting into your databases, potentially exposing your data to leaks and loss. Thus, the data's security and privacy are jeopardized.
Steps to Reproduce
Using GCP Console-
- Log In to your GCP Console.
- From the top navigation bar, select the GCP project you want to investigate.

- From the navigation panel on the left side of the console, go to SQL. You can use this link here to navigate directly if you’re already logged in.
- Select the ID of the SQL instance you want to investigate from the list of instances available and click on the CONNECTIONS tab.


- In the NETWORKING section, under Authorised networks, check if any of the authorized networks are configured to allow anyone on the internet to access your SQL instance. (This happens when the IP address is set as 0.0.0.0/0)

- Repeat steps 4 and 5 for all the SQL instances you want to investigate in the selected project.
- If you have multiple projects, repeat steps 2 to 6 for each project in your GCP Console.
Steps for Remediation
Determine whether or not you truly require your SQL databases to be publicly accessible. If not, make the necessary changes using the steps below.
Using GCP Console-
- Log In to your GCP Console.
- From the top navigation bar, select the GCP project you want to investigate.
- From the navigation panel on the left side of the console, go to SQL. You can use this link here to navigate directly if you’re already logged in.
- Select the ID of the SQL instance you want to reconfigure from the list of instances available and click on the CONNECTIONS tab. (In case you aren’t sure which SQL instance needs to be configured, follow the steps to reproduce listed above to determine which to choose.)
- Go to Authorized networks in the NETWORKING section and click on the DELETE button of the 0.0.0.0/0 global IP address if you wish to delete the network.

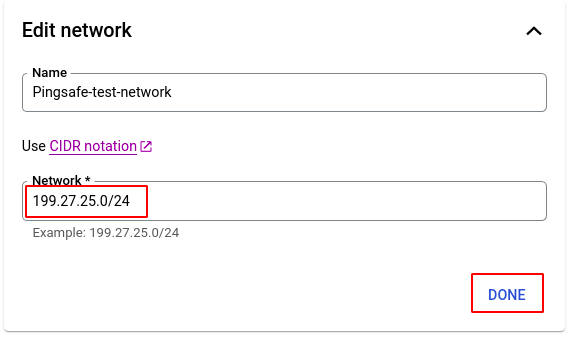
- You can also edit the IP Network by clicking on the arrow button as shown in the screenshot below.

- Choose your desired network using the CIDR notation and click DONE.
- Finally, click SAVE to save all the changes.
- Repeat steps 4 to 8 for all the SQL instances you want to reconfigure in the selected project.
- If you have multiple projects, repeat steps 2 to 9 for each project in your GCP console.