
This plugin ensures that cross-account access is prohibited by SQS regulations.
Risk Level: MEDIUM
Description:
This plugin ensures that cross-account access is prohibited by SQS regulations. SQS policies should be tightly regulated to avoid unexpected sources from posting or reading from the queue. These privileges can be limited via queue policies.
Recommended Action: Update the SQS policy to prevent access from external accounts.
Configuration Parameters:
Whitelisted AWS Account Principals:
The whitelisted AWS account principals is a comma-separated list that contains the name of all trusted account principals in the Pingsafe dashboard.
The default value in the whitelist is an empty string so it shows an error for any account name which it is compared with if scanned with its default value.
SQS Whitelist All AWS Organization Accounts:
This parameter has two valid values i.e. True or False. If the default value is set to true, it will trust all the accounts present in the current AWS organization.
Similarly, if the default value is set to false, it will not trust any of the accounts present in the current AWS organization.
About the Service :
SQS (Amazon Simple Queue Service) is a fully managed message queuing service for decoupling and scaling microservices, distributed systems, and serverless applications. SQS removes the complexity and overhead of managing and operating message-oriented middleware, allowing developers to concentrate on work that is unique. You may send, store, and receive messages across software components using SQS at any volume without losing messages or necessitating the availability of other services.
Impact:
Allowing untrustworthy cross-account access to your SQS queues might result in unlawful actions like intercepting, deleting, and sending queue messages without permission. Limit access exclusively to trustworthy entities by adopting the essential SQS policies to minimize data leaks, data loss, and unexpected expenses on your AWS bill.
Steps to reproduce :
- Sign in to your AWS Management Console.
- Navigate to the SQS dashboard at: https://console.aws.amazon.com/sqs/
- Select the SQS queue that you want to examine.
- On the queue dashboard that appears click on Edit..
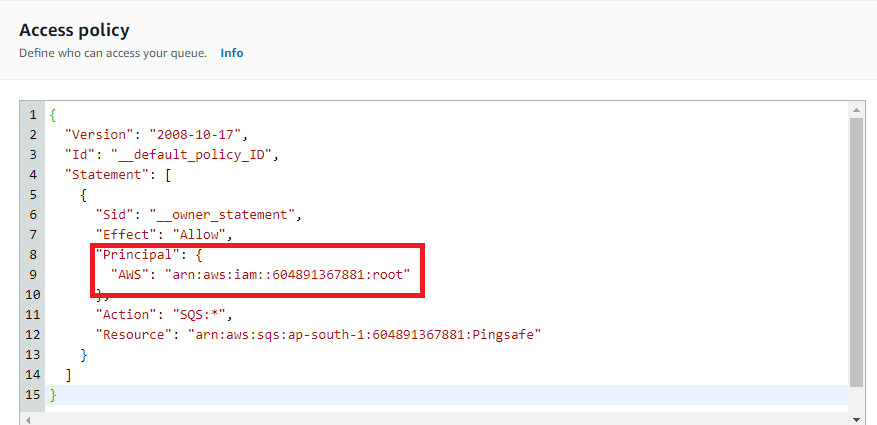
- Scroll down to Access Policy, and check the values set for the Principal attribute.
- One by one check each id from the Whitelisted AWS Account Principals.
- If it does not matches with any of the values, match it with the SQS Whitelist All AWS Organization Accounts.If it doesn’t matches with any of that too, then the sqs is vulnerable to cross-account access.
- Repeat steps no. 3-7 for each SQS present in the current region as well as for other regions.
Steps for remediation :
- Sign in to your AWS Management Console.
- Navigate to the SQS dashboard at: https://console.aws.amazon.com/sqs/
- Select the SQS queue that you want to examine.
- On the queue dashboard that appears click on Edit..
- Scroll down to Access Policy, and check the values set for the Principal attribute.
- One by one check each id from the listed values and compare it with the account ids from the Whitelisted AWS Account Principals.
- If it does not matches with any of the values, match it with the SQS Whitelist All AWS Organization Accounts.If it doesn’t matches with any of that too, then the sqs is vulnerable to cross-account access.
- Remove all the ids from the Principal value which are vulnerable to cross-account access.
- Repeat steps no. 3-8 for each SQS present in the current region as well as for other regions
References: