
Ensures that storage buckets are not publicly accessible.
Risk Level: High
Description
This plugin ensures that global permissions are not allowed in the storage bucket policies. The storage bucket logs provide information about the storage consumption and requests made on a specific bucket on a timely basis. As a result, it must be assured that the storage buckets are not accessible to the public and that only the required users have access to them.
About the Service
Google Cloud Storage:
Google Cloud Storage is a service that provides dependable and secure storage classes for any workload, allowing users to select cost-effective storage alternatives based on their requirements. You can effortlessly move data to Cloud storage and benefit from its strong security and scalability features. To know more, read here.
Impact
If your bucket is configured such that the allUsers and allAuthenticatedUsers principal types are granted then anyone on the Internet can read and analyze your data. As a result, attackers will have an easier time accessing your cloud storage buckets, rendering them subject to data leaks and loss.
Steps to Reproduce
Using GCP Console-
- Log In to your GCP Console.
- From the top navigation bar, select the GCP project you want to investigate.

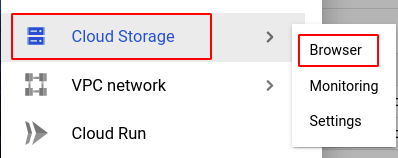
- From the navigation panel on the left side of the console, go to Cloud Storage and select Browser. You can use this link here to navigate directly if you’re already logged in.
- Select the storage bucket you want to investigate from the list of buckets displayed and go to the PERMISSIONS tab of the selected bucket.
- Select PRINCIPALS as the View by filter and check the Principal column in the table if allUsers or allAuthenticatedUsers principal is being granted. If yes, then the selected storage bucket can be accessible by anyone on the internet.
- Repeat steps 4 and 5 for all the storage buckets you want to investigate in the selected project.
- If you have multiple projects, repeat steps 2 to 6 for each project in your GCP Console.
Steps for Remediation
Determine whether or not you truly require buckets to be publicly accessible. If not, make the necessary changes to enable it using the steps below.
Using GCP Console-
- Log In to your GCP Console.
- From the top navigation bar, select the GCP project you want to investigate.
- From the navigation panel on the left side of the console, go to Cloud Storage and select Browser. You can use this link here to navigate directly if you’re already logged in.
- Select the storage bucket you want to reconfigure from the list of buckets displayed and go to the PERMISSIONS tab of the selected bucket. (In case you aren’t sure which storage bucket needs to be configured, follow the steps to reproduce listed above to determine which to choose.)
- Select PRINCIPALS as the View by filter and select all the rows which have the allUsers or allAuthenticatedUsers in the Principal column.
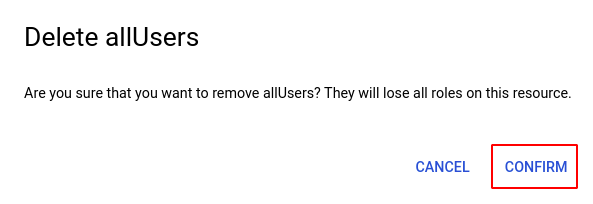
- Click on the REMOVE button to remove all the selected rows.

- Click Confirm in the confirmation box to confirm the action.
- Repeat steps 4 to 7 for all the buckets you want to reconfigure in the selected project.
- If you have multiple projects, repeat steps 2 to 8 for each project in your GCP console.