
Ensures that storage buckets’ retention policies are not about to expire.
Risk Level: Low
Description
This plugin guarantees that the bucket retention policy is set and that it does not expire before the number of days specified. Google Cloud Storage allows you to add a retention policy to the storage buckets to set a retention period. This ensures that the buckets do not get accidentally deleted until the retention period ends.
About the Service
Google Cloud Storage:
Google Cloud Storage is a service that provides dependable and secure storage classes for any workload, allowing users to select cost-effective storage alternatives based on their requirements. You can effortlessly move data to Cloud storage and benefit from its strong security and scalability features. To know more, read here.
Impact
If a storage bucket’s retention policy is about to expire then the objects in the bucket can be deleted or replaced any time once the policy expires. This poses a risk because the buckets could be accidentally deleted or modified, resulting in data loss.
Steps to Reproduce
Using GCP Console-
- Log In to your GCP Console.
- From the top navigation bar, select the GCP project you want to investigate.

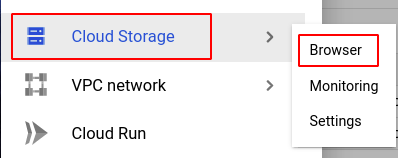
- From the navigation panel on the left side of the console, go to Cloud Storage and select Browser. You can use this link here to navigate directly if you’re already logged in.
- In the list of buckets available, check the Protection column to find out if there are any buckets whose Retention policy is about to expire.
Note: If no retention period is being displayed, the bucket's retention policy hasn't been set up. To set up the retention policy, refer to the link here.
- If you have multiple projects, repeat steps 2 to 4 for each project in your GCP Console.
Steps for Remediation
If the retention policy of your bucket(s) is about to expire, make the necessary changes to extend it using the steps below.
Using GCP Console-
- Log In to your GCP Console.
- From the top navigation bar, select the GCP project you want to investigate.
- From the navigation panel on the left side of the console, go to Cloud Storage and select Browser. You can use this link here to navigate directly if you’re already logged in.
- Select the storage bucket you want to reconfigure from the list of buckets displayed and go to the PROTECTION tab of the selected bucket. (In case you aren’t sure which storage bucket needs to be configured, follow the steps to reproduce listed above to determine which to choose.)
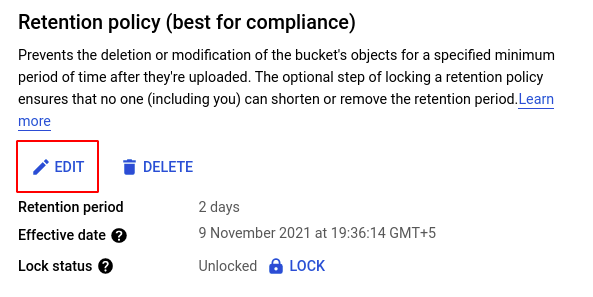
- In the Retention policy section, click on the EDIT button to edit the retention policy.
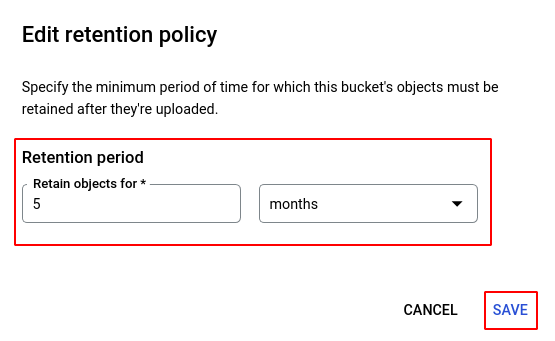
- In the Edit retention policy dialog box, fill in your desired Retention period and click SAVE.
- Repeat steps 4 to 7 for all the buckets you want to reconfigure in the selected project.
- If you have multiple projects, repeat steps 2 to 9 for each project in your GCP console.